Leaderboard


Popular Content
Showing content with the highest reputation on 09/24/2020 in all areas
-
5 points
-
4 points
-
Yes, yes, yes!!!
 4 points
 -
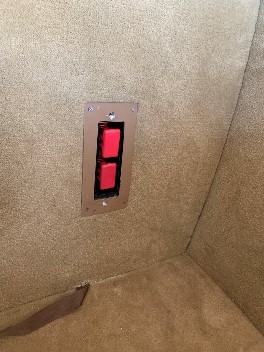
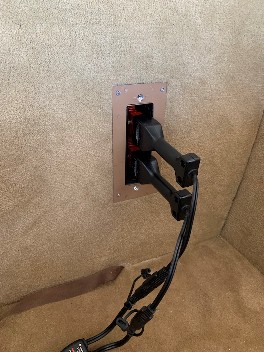
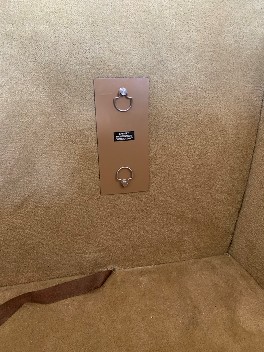
I wanted a Battery Minder installation with airframe interface, but I want to make it convenient and neat to use. I got a 3X5 aluminum project box, modified it to include a face and a platform to mount the plugs. So far I like the results. Here are the plugs inserted Here is the cover plate with CamLocs Here is the box from the equipment bay
 3 points
 -
If you're looking for a project, then this is a great option. I agree with @GeeBee that you should get the shell for closer to $5K. BUT... if you're looking for a cheap way to get into a Mooney so you can have a Mooney to fly... this is not it. Spending the $44K on a flying Mooney with a current annual will be quite a bit cheaper.3 points
-
Glenn - certainly not having a go at you, but regarding your subject line, there is no such thing as "830 vs. 900". It isn't even close. Not even a fair fight, because you're talking about two completely different products. Do yourself a couple of favors...stop over-analyzing, lose the notion you seem to have about "redundancy" between the 830 + your ship's factory gauges, and go with the 900 or the 930. Having flown extensively behind both (as well as the older 700), I can tell you they're worth every penny and then some. There is nothing the 830 will do that the 900 and 930 will not. The capability of the latter two is far superior. Steve3 points
-
Use extreme caution when getting invited to go for a ride... If you have only flown a handful of Brand C... the M20C is powerful and fast by comparison.... You will be ready to pull the trigger right about the time Vr occurs... Which can be odd... you are already flying, but you want to return to take care of business... If you like to live financially dangerously... go for a ride in something that has near 300hp in it... It is hard to not go home and work out the financing details to cover the larger cost... With great power, comes great responsibility... (Peter Parker’s Grandfather probably flew a Rocket...) Transition Training is always in style... Best regards, -a-3 points
-
I'll be at the SWTA shop all day tomorrow. There are a couple of TKS birds in the shop. I'll see if I can take a look at the W&B for them and respond.3 points
-
I finally found a mechanic that I like in Vegas! He got furloughed from Maverick due to COVID and sent out a really professional letter with his resume offering his services as an IA to all the plane owners in the valley that he could find in the database. Judging by the effort he put into the letter it seemed like he had a great work ethic, and I needed an annual, so I figured why not try him? Got the annual done in my hangar in 3 days at a very fair price. Very happy to refer him to anyone that needs a mechanic in Vegas.3 points
-
I use a couple of 2x12’s under the mains, then fine tune it with nose wheel psi. My hangar floor is fairly level but you can adjust left/right with tire psi on the mains.2 points
-
Just to close the loop on this, the shop that made the mistake on the diode just sent me a check for all of their original work to install the alternator and troubleshoot the issue. Even though I spent a lot more, I thought that was very fair of them. There are a lot of shops/mechanics who would try to play the blame game and this wasn't one of them.2 points
-
Heres a picture from the FIKI Encore that I had. The 80 lbs includes the fluid
 2 points
 -
A quick 180 nm run up to Cleveland yesterday at 9,000 MSL. A Rocket is not "efficient" at 17-19 gph, 65% power, 30" and 2300 rpm, but it is wicked fast...which is just plain fun. My UL is about 920.
 2 points
 -
The cowl damage could have been a result of hitting a tree stump or something else on impact. I wouldn’t assume it’s a result of an engine coming apart.2 points
-
2 points
-
Thank you. I have just ordered a rainbow colored switch.2 points
-
Found it for ya. See link Section 8 page 47: https://www.jpinstruments.com/wp-content/uploads/2012/06/PG-EDM-730_830-Rev-A-02-JULY-2009.pdf2 points
-
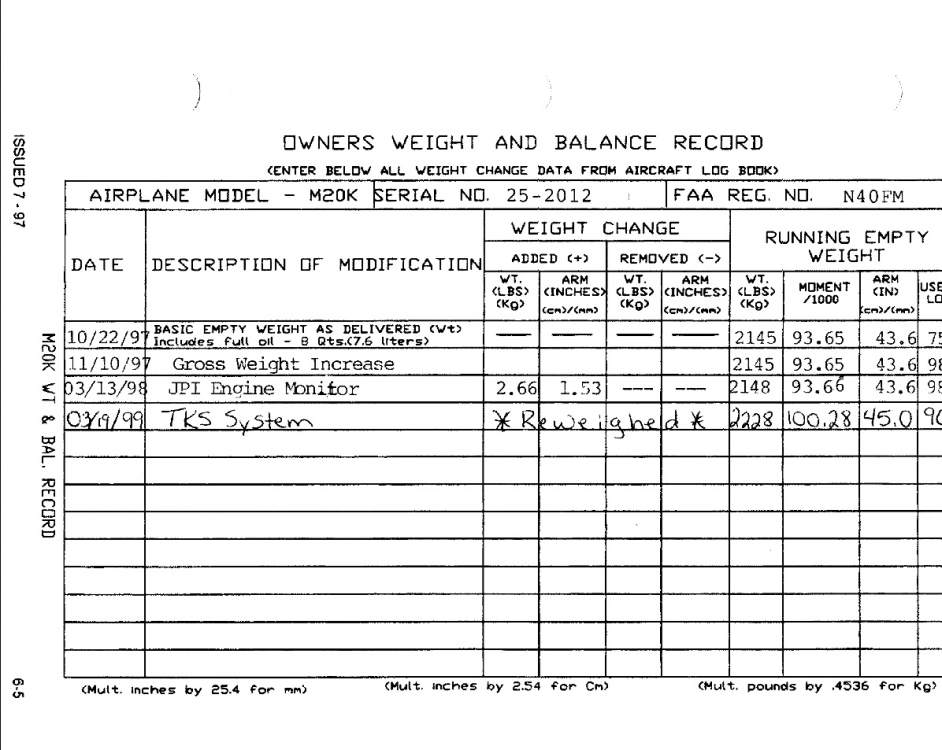
Those guys are good but we need guys with TKS airplanes and their weight and balance handy.2 points
-
Black switches matter.2 points
-
Due to the variation in how tanks are filled, and the specific gravity of the fuel used, it is impossible to be accurate by filling the tanks and then calculating the fuel out. The weight will vary from -5 to +20 pounds on an M20C. I always weigh with full engine oil, fuel drained, and unusable fuel added in per the manual.2 points
-
@LANCECASPER @gsxrpilot Let us invite a couple of flyers into the discussion.2 points
-
I'd pull the access cover near the pitot. Take off the wire(s) (not sure if the return path is through the aircraft frame). Then, use an ohmmeter to make sure the pitot has some resistance (>1 ohm, <5 ohm, rough numbers!). Next, use a voltmeter to measure across the feed wires (or, hot wire to ground) with the pitot heat switch on. Should see battery voltage. If not, check for voltage on both sides of the pitot switch. If no voltage on the pitot side, the switch is bad. If no voltage on the source side, check the CB on both sides. (you may just have a CB/switch). That should narrow it down to a wiring versus failed component problem.2 points
-
I just got an Apple Watch 6, it has a pulse oxymeter so I wanted to try it out. It can work without the phone nearby but you do need an iPhone to set it up. I'm not sure how well it will work at altitude but I'll try it out on my next flight. The heart rate and rhythm monitoring seem to work fairly well. I'm also going to try a few aviation apps that are available for it.2 points
-
The correct elastic grommet for the valve stem on the 5.00-5 wheel is part number 217-00100. It cost about $12 on Aircraft Spruce. The staff at Spruce kept trying to tell me the part was $93 and was 05-14654. Several local mechanics advised me to get 217-00100, and Dugosh had one. When the wheel was removed and disassembled, it was clear that 217-00100 was the correct part. This is for the nose wheel only. The mains are different. Ray2 points
-
My airplane is the fattest C in existence at 1771 lbs. The CG is 46.15, so I think the 49" numbers are most likely incorrect. My weights were 615 for the left main, 614 for the right main and 542 nose wheel. The OP said the nose arm was 3". That has to be incorrect. Mine was close to 0. This is the distance between the center of the nose trunnion and the center of the nose axle. Can't be 3". My distance the nose and main axle centers was 66.5, so 65.75 is believable. If you want to check the math, print and read the weight and balance work sheets, go to the airport with those sheets, a plumb bob, a level and a tape measure. Park your airplane on a nose downhill slope and check for level. Deflate your nose tire as needed. Measure the distance between the nose wheel axle center and main wheel axle centers. Fill out the first part of your worksheet (assuming your weights were correct). Measure the distance from the center of the nose gear trunnion and main wheel axle centers. This is where you will find the 3" difference. Fill out the second part of your worksheet. This will not be an exact calculation as the gear discs are slightly compressed with all the stuff in your airplane that should not have been weight and the 30 gallons of fuel you didn't drain. But, it will give you a pretty good idea. My airplane was weighed earlier this year after an installation by Pee Dee Avionics in Cheraw, SC. They had the scales, they removed a fuel line and pumped out most of the fuel, then drained the remainder of the fuel. Then added back the unusable fuel. I think they charged a few hundred dollars.2 points
-
Yes, as a matter of fact we still dont see RPM on the electronic ignition, but get it on the mag during run up. We just went down for annual today and we are installing the correct resistor to get the rpm to read on the electronic ignition. I will report back as to what that size is. Just as an FYI, we checked with both EI and Surefly about getting it to work and both places said just keep trying resistors. Option B is to put a dial on it like the panel lights and turn it until you get the RPM to show. When it shows, dont move the knob and put a meter on the dial and read the resistance and you will have a real good place to start with the correct resistor.2 points
-
Saw this on FATPNW (facebook group) Hi, I am listing this for a friend. Beautiful Airplane! Good condition Aeronca Chief for sale: $14K # Own/Fly a Certified Aircraft for under $15K and $15/hr *(Based on 4 gal/hr of ethanol free auto-gas)* Nice pre-war; 1938 Chief with mid-time 65hp Continental and metal prop AFTT: 2307 SMOH: 396 Features: Certified with no electrical system (exempt from ADS-B) Side by side seating (compared to tandem Champ) Toe brake conversion (includes original heel brake parts) Includes King handheld radio, intercom, headset and nice tailwheel towbar General Currently out of annual (last annual 07/01/2019) Based at Crest Airpark (Norman Greir) S36 Starts easy (often on first pull) and runs without issues Flys fine (cruises at about 90) with no adverse characteristics A very inexpensive, fun way to fly or build time but not a practical cross country plane as it's relatively slow with limited range (12 gal tank) Text Only: Linn, 206-240-77062 points
-
Look at the approach with the wires. It’s something even more special-er.2 points
-
@takairsaid this but I’m gonna go out on a limb and say it more clearly... leaning to a specific egt in cruise is wrong. There is a “target egt” method for climb but that’s different. Even if you’re flying at the same altitude as yesterday when you leaned properly, there are other factors like temp and pressure that might affect your egt. Step one for your troubleshooting is going to be to set up for cruise at say 7,500’, 2500rpm, full throttle, close to full rich. Then slowly lean, very slowly. Watch the egts rise. They will go up until they peak, then they will drop again just like @N201MKTurbosaid. They may not peak at exactly the same time. That’s ok. You just need the first one. Once the first one peaks, go RICH until that egt drops 100 degrees. Boom, done. You are 100rop. Now let it settle and see where your chts and oil temp are. Next time we’ll do lop. In either of them, you can be off by say 25-50 degrees of egt and it will make a huge difference. Go slowly and get it pretty close. If you were to say set 50 rich of peak, you’ll definitely have hot chts and oil! Your pictures look good. Nothing really obvious.2 points
-
The relevant territory regarding oil temps seems to have already been covered here. So I'll go off topic and mention that you might want to consder some fire sleeves for your oil and fuel hoses2 points
-
2 points
-
No , I shot it at Peter Garmins Dental salon and spa.... The place is bangin !!!! Marble counters , hot hygienists , with ample breasts , and midgets that brush your teeth , and clean your gums....2 points
-
Hi! I hope this will help other Bravo owners who struggle to run the TIO-540-AF1B at Peak or LOP TIT. But first, in full disclosure I am not an A&P and this is not advice. I am simply illustrating my experience with this engine, and it or may not apply to you. Always follow the POH when you are not sure that your deviation from that document is in your best interest. I am a lean of peak fan, always have been. It comes back from my days of working on non-aircraft internal combustion engines and proving that an engine run LOP operates cooler, cleaner and lasts longer than a similar engine run ROP. I have taken the Advanced Pilots Seminar course on advanced engine management http://www.advancedpilot.com and had numerous discussions with Lycoming engineers, the folks at GAMI and engine builders, and I have used this knowledge to come to a few conclusions about this engine that I would like to share. I am not poking the sleeping “ROP vs LOP” dog. :-) and I realize that Lycoming - in some instances but not all - does not recommend operating LOP. I also believe that if they could, they would revise that language to say: If you have a good engine monitor, tuned injectors, and a knowledge of how your engine operates, you should run LOP whenever your heart desires - except on take off. My opinion is that Mooney, when they introduced the TLS, continued their fine mission to make the fastest commercial SE piston airplane. To do this, they needed a lot of power -and- in a weight package that would not cause the flight envelope of the long body to get too forward on the CG, the TIO-540 was the answer. Bravo owners know that the airplane is already pushed forward CG and many have Charlie weight for aft ballast installed (which lowers the already skinny useful load). The TIO-540 is a complex high performance engine and should not be grouped with most other ground boosted engines for performance discussions, The reasons for this, IMHO, are due in part to two things: 1) a complicated (but effective) turbocharging controller system, and 2) the requirement that the engine runs at very high percentage of power levels to make book speeds. I did a post a few weeks ago on the Bravo’s power percentage here. Because this engine is normally operated at greater than 80% power during cruise by most people, this engine is very working hard and making a lot of heat for a lot of the time. It is also doing so with rather loose factory tolerances on the precision of fuel flow to the cylinders which makes it extremely difficult to run this engine in an wide and efficient range of power settings. The POH states only two settings: 1) ROP TIT by at least 125dF for “best power"; and 2) Peak TIT as long it’s below 1750dF (1650dF at high altitudes) for “best economy" - the latter is sometimes impossible to achieve with this engine at higher power levels (30” MAP and above) because of poor fuel distribution which causes engine roughness. When near peak TIT (or EGT) the roughness is normally due to some cylinders running leaner than others. The leaner cylinders produce less power than do the richer cylinders which give you the impression that there is something wrong because you feel that power imbalance as roughness. (Note: that slight roughness is not a bad thing, your engine won’t fly apart, it really doesn’t care, only you do.) Spark plugs play a key role in this too - more on that in a bit. Here’s the rub... Because most of the TIO-540-AF1Bs have unequal cylinder fuel distribution, when Bravo owners try to run the engine per the Sun Visor chart at Best Economy (Peak TIT) they may find an disconserting “roughness” and feel a slight loss of power. That combo causes some consternation, and when that happens, some operators I’ve spoken with will simply dial the Bravo’s red knob in just a little richer and go slightly rich of peak TIT just enough to cure the roughness. Thinking that they are now 'just fine’ they fly the engine at that setting - when in fact they are not “just fine." They are now operating the engine “slightly ROP TIT” at a mixture setting that causes the most cylinder head heat, the highest internal combustion pressures and at a place where the engine can easily begin to exhibit detonation. (See graph below, which was taken from the Lycoming Flyer publication) The Mooney POH does not say it is OK to run the engine “slightly” ROP TIT because both the factory and Lycoming know that is a very bad mixture setting. All of the experts I’ve spoken to agree that no internal combustion engine should be operated “slightly” (10-60dF) rich of peak. If you can’t make Peak TIT for whatever reason, better to just go greater than 80-100dF and accept the extra fuel costs and keep things in the engine cooler and happier. I have not found anyone who disagrees that sustained high heat weakens, fatigues and shortens the life of the metals used in engines, and that’s why we see all kinds of advice about keeping cylinder head temps below 400dF. The Bravo’s POH advises that you use a combination of gauges when setting power - TIT and CHT as the most prominent. The POH also says that the CHT redline for this engine is 500dF - which everyone (experts or not) agrees is simply ridicules. If you have an older Bravo, and especially one where a field AF1A to AF1B conversation was done, you may want to check to see on which cylinder the panel’s CHT temp probe is located. The AF1A probe was located on cylinder #5, and Mooney Service Instruction M20-101C states that it should be on cylinder #3 for the AF1B. Check yours, especially if you rely on the single panel CHT gauge, I’ve spoken to three Bravo owners where the CHT probe was still on #5 (mine was too). There is a big difference in the cooling between #3 and #5 - #3 being as much as 50dF hotter. That all said, in summary the TIO-540-AF1B is a hot running, high power, high performance engine, different from many others. In the M20M it is asked to operate at the top of its performance range in order to make POH (book) performance numbers, and us Mooney drivers like to go fast! Adjusting the mixture on this engine can be tricky due to engine’s generally unequal cylinder fuel distribution and, in many cases, the wrong type of spark plug being used. I wanted my Bravo to act like most other well-tuned and instrumented airplanes I’ve flown. While always keeping the cylinder head temps below 400dF, I want to be able to safely set the engine for maximum power when I want to go fast, and I want the ability to safely save fuel when fast doesn’t matter as much. I don’t want complicated instructions to do this, and I want to feel as if the engine is happy and smooth no matter what. Before I started this trek, I could not run my Bravo at Peak TIT at MAP higher then 29” without noticeable roughness and/or what I felt was unacceptable power loss. And there was no way this engine would run LOP. I would flow about 22 GPH of fuel in cruise at 100dF ROP TIT (on hot days I needed to to be richer to keep the CHTs below 400dF). Here’s what I did. I first ensured that magneto timing was correct. This is very important with high performance engines; you can often get away with inexact timing on lower power engines, but never on engines like the TIO-540. Mine were pretty close, but not exact - they are now. I had new Champion massive plugs installed about a hundred hours earlier, on inspection they looked okay and they passed the tester test. We gapped them at .016. I installed a new set of GAMI TurboInjectors. When I spoke with the factory rep John-Paul he cautioned me that this engine was a hard tune and that I should expect to have to work at, and that there might not be the success that others have with GAMIs on other engines. I love honesty - these guys at GAMI are true pros. The first set of injectors made a marked and clear difference. I was able to run at Peak TIT smoothly for the first time, but I was unable to run LOP without roughness. I did a GAMI lean spread test and found that my spread was about 1.4GPH, while better, it was not ideal. I contacted the factory and John-Paul immediately sent out two replacement injectors for a better match. After that a test flight or two it showed that I actually picked up about two knots at peak TIT and fuel flow was down a little. I could now get a little bit LOP with a GAMI spread of .9GPH. Also noticed CHT were generally cooler by about 20dF. This was due to the fact that the better fuel distribution was allowing all cylinders to run more equally, so at Peak TIT all cylinders were closer to their peak EGT. Fuel was saved for the same reason - unnecessary rich cylinders were now leaner for any given mixture setting. Because this engine seems finicky at different MAP/RPM settings, I decide to tune to a specific sweet-spot for the GAMI spread - I picked 29”/2400 for this as it is, according to the Lycoming power graphs, about 75% power on a standard day, at mid altitudes. This might have been the most important step I took in achieving success with this tune, on this engine to allow for good LOP performance. I sent the new GAMI lean test to John-Paul - not satisfied he sent me a single replacement for the one cylinder that was off a bit. (no charge for all of this and no questions asked). We installed that one injector and then did a test flight. The biggest change was that I could get more LOP without roughness, at 2400/29” I could get to about 20dF LOP. I would lose about 9 knots, but I was able to save almost 6 GPH of fuel. While I still couldn't get much past Peak TIT at higher power setting I was happy with the trade off; now I could achieve both fast and efficient settings. My GAMI lean spread was now a very comfortable .3GPH as you can see from the graph below. I thought that was all I needed to do but it wasn’t ... I have a Savvy Aviator account, I upload my JPI engine analyses data there, and I happily buy their yearly analysis service. I uploaded a flight and was looking at the graph and saw something on one of my lean spread tests that I could not understand. During a lean test, you should see all EGTs rise as you get leaner and leaner, then they should all peak (at slightly different times, that’s the fuel flow “spread”) and then they should drop off. On my test, there was a second peak? I submitted the flight for review at Savvy and Paul Kortopates wrote back and explained it, and as soon as I read his explanation I understood: He said "That second "peak" is actually what happens when the mixture goes lean enough to fire only one plug. You are seeing the same rise we would see if you switched off one of the magneto's so that there was only one plug firing- which is what we're seeing here. On one plug alone, combustion is slowed and therefore when the exhaust valve opens we are seeing more of the combustion event and the associated higher EGT because of it” That’s when we discussed the last step I needed to take to get this whole project right - new plugs - but specifically fine wire plugs. It seems as if the fine wire plugs work better than the massives in two instances 1) older wet and oily engines (not the case here) and; 2) in lean mixtures. They’re expensive, about $80 a shot, but they also are suppose to last hundreds of hours longer. After researching both Champion and Tempest, I opted for the Tempest Fine Wires and installed 12 of them. Paul was right on! From the moment I turned the key I could tell that something was different. The engine started better and ran smoother on the ground and in the air, and I am now able to run LOP at 32” MAP and below if I chose. My CHTs are generally 30dF cooler than when I started this project, and I am saving fuel at every power setting. Where I use to run 22GPH at 2400/32 ROP, I now run 20GPH with the same airspeed, and if I want to throttle back to 2400/29, I loose about 10 knots and run about 15GPH at about 20dF LOP. In all, I have about $2500 invested here, but in fuel savings alone that will pay back in short order and then keep paying back. The big benefit is that I have more power options now with the aircraft and my engine will be much cleaner with less carbon deposits on the heads, the values, the plugs and the exhaust system. My flight profiles are not religious LOP, and yours don’t have to be either to get a benefit from the cleaning and cooling aspects of running your engine with a proper mixture, which, for me includes LOP at times. Typically I will run lower power and LOP in tail winds of any speed, because why not? If I loose 10 knots true in LOP but I make up some or all with a tail wind, I’m saving 5-6GPH of fuel AND cleaning the engine as I go. Thanks for reading! I attached some pics - happy to try to answer any questions. Dave1 point
-
I ran across this over on BT and had to share it. Some really great video and mountain scenery (just not a mooney) of a Silver Eagle. Quite impressive if it matches your requirements (super short field, jetA, etc) and your budget...1 point
-
One thing about the plate at the back of the oil cooler... It is a fence to keep thing from encroaching behind the cooler.... It is easy to see the front of the oil cooler needs air to flow in.... If things creep In behind the oil cooler, the flow gets blocked without much attention to why or how... It can also be a heat shield for the things that are trying to encroach... air exiting the oil cooler can slowly bake stuff on the way by... PP thoughts only, not an air flow modeler.... Best regards, -a-1 point
-
I have a 65E with the oil cooler relocated aft in the cowl and the cowl closure mod. The highest I have ever seen my oil temp on my JPI was 230. That was on a super hot day during climb out. Normally, my oil temp is Between 189 and 192 degrees at cruise and it’s VERY consistent. My CHT’s range from 340 to 370 during all phases of flight. I run ROP. You’ve received some great technical advice here. A couple things that separate our E’s from our J brothers who share the same IO360 is, the E model doesn’t have very large cowl flaps. Unlike its J and later brethren who have larger, barn door cowl flaps that extend down much further than the E. Make sure you’re leaving those cowl flaps open on climb out and honestly, as small as they are on the E, I leave mine open during short low level flights and they are part of my landing checklist and opened up just after gear extension. Our planes engines are tightly packed in their cowlings making cooling a challenge. When it’s hot out and your climbing out, adjust your climb angle. For me, 120 indicated works perfectly. But if I decrease speed, increase pitch, I’ll see temps go up rapidly.1 point
-
I noticed you are missing the air deflector installed on the aft side of the cooler. That helps keep air flowing through the cooler and down out the exits instead of back flowing by the cylinders. Also, check to make sure the correct gasket is on the oil pressure screen housing for which housing you are running. There are three different setups. Stock oil pressure screen housing, remote housing, and oil filter housing. I once installed the oil filter housing and I used the pressure screen gasket. That didn’t work too well. The IPC isn’t very good. I may have missed it but has The vernotherm been inspected? I see you have a fresh pacific oil cooler sticker on the cooler. They’ll test the vernotherm as well! Finally, I’ve sealed the front areas with silicone around gaps by the cooler and the cowl. Some have made air dams to trap the ram air into the cooler. Not advising, but I’ve seen it on several M20’s at OSH. -Matt1 point
-
On the right side of the accessory case, it’s about a 7/8 inch hex that’ threads intro the case.1 point
-
Ok since we are slightly side stepping the no politics rule in this thread I will only post one. What is the difference between a chick pea and a garbanzo bean? Trump has never had a garbanzo bean on his face.1 point
-
A modern Fitbit goes about one week on a charge... Before that final day, you will get an email or text that reminds you... and you have a day or two to take care of it... All of these devices are pretty easy to find out how much charge they are carrying... Charging daily during shower time is more than enough time to keep it charged... Since I’m collecting sleep data, I’m always interested in keeping things alive so it doesn’t croak during the night... or start a run with no juice in the tank... Going on the road requires planning... Spare charging devices or batteries in key places... or a tech to go kit... helps... The ultimate in needless, but really cool electrical devices... wireless ear buds... They sense when you are using them, and when you stop... they even measure HR too... PP thoughts only, not a tech guru... Best regards, -a-1 point
-
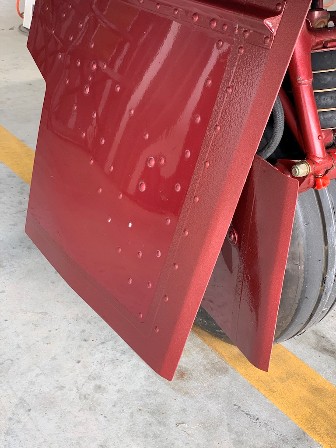
So I pulled the trigger while doing my annual. I am very pleased with the results. My gears door paint kept getting torn up from precipitation and ice. I hope this product will solve the problem. I used SEM 2K tintable gravel guard and matched the color. From the distance you cannot see the texture difference. Up close more so. Here is a before picture Here is the after from a distance Here is a close up


 1 point
 -
The EGT's dont matter. There is no limitation on EGT. EGT is only a reference. When I'm flying at peak EGT, they are around 1550 to 1600. TIT is a limiting factor. You dont have a turbo. Also EGT arent usually completely accurate. You would only use EGT's to reference where you are in correlation to peak. Its an OWT that EGT's have limitations. At peak EGT, youre EGT's will most likely be above 1500, and thats completely fine.1 point
-
I always want to know the payload. I define that as the useful load remaining after the fuel tanks, oil, and everything else is topped off. One must also consider the weight of headsets, portable O2, and anything else that lives in the plane. For my J, the 904 lbs. of useful load translates to 522 lbs. payload. My Sweetheart and I combine for 290, leaving 232 for baggage and additional passengers. I do not always need 64 gallons of fuel, so some payload can be reclaimed there. I get another 81 lbs. by fueling to 50 gallons (tabs - verified as accurate). Thus four Mooney sized people but very little baggage. Leaving another hour’s fuel behind gets me 58 lbs. of baggage. I think with a few upgrades (about 25 amu worth) I can reclaim 30-40 lbs. with improved performance. We shall see.1 point
-
I have read, more than once, on Mooneyspace about the emergency gear mechanism being armed inadvertently during loading of rear-seat passengers and preventing gear retraction. I have added an item to my pre-takeoff checklist to check this.1 point
-
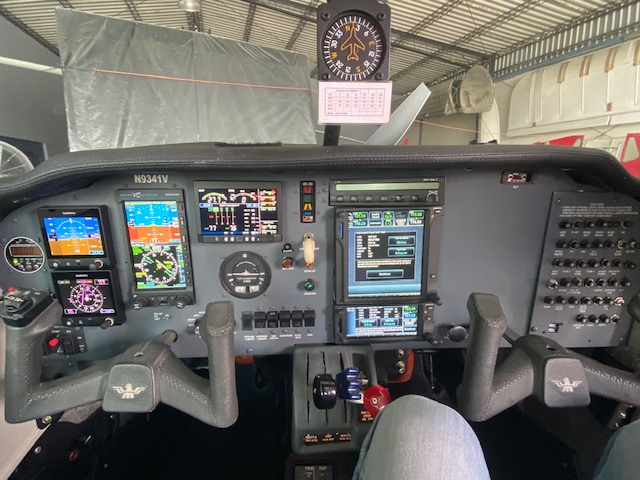
I fully agree with you. And this is how my panel looks now:
 1 point
 -
The number of Ercoupes damaged in any kind of accident is probably smaller than the number of ground-looped taildraggers. Insurance is higher for them for a reason. Also easier to learn to land a tricycle gear.1 point
-
All I just want to say thank you for your help, questions & suggestions. I will work to gather this information and get it back to you all over the next week. I will go up and log the information. I also can try to sort out how to log the information from the EM JPI 730 and share my settings.1 point
-
Haha - re: fuel, One of the things I had done while the cowl flap motor was out was take the belly off for a closer look and found the fuel selector valve leaking. So went ahead and had the fuel selector valve o-rings replaced. Once that was done, I wanted to replace the worn out adel clamps around the cowling and I noticed deep nicks in the ignition harness so swapped that out and, why not, replaced the spark plugs as well. Took the opportunity to get the cylinders boroscoped and compression tested. Glad I got the opportunity to learn a ton while the plane was grounded. Best yet - looks I still have a lot more to learn!1 point
-
I don’t know the answer, but your question is definitely tasteless ( fits nicely into this despicably tasteless thread).1 point
-
I had a Budweiser once. An experience I would gladly forget.1 point