Leaderboard


Popular Content
Showing content with the highest reputation on 10/26/2019 in all areas
-
Wait --- isn't it the instructors job to bring his own shoulder restrains?? I shouldn't have to pay for your equipment. /S7 points
-
Light Painting of Maggie in San Diego. Wonderful gift of light painted photos by : Gary Buzel who is a pro photographer and the VP of King Schools [does all the video production]. This was a Montgomery Field in San Diego. Here is Gary's website: https://www.illumigraphic.com/ and https://www.creighphotography.com/ The photo shoot was such a blast. Christmas is coming! My advice: Get a session booked today. Second piece of advice: when able, be a Unicorn!


 5 points
 -
As you might have heard, the McRib is back at McD's. Unfortunately someone in Minnesota must have upset the folks at Mickey D's Corporate because they are absent from every store in Minnesota, except Worthington, MN. So I just got back from a 1 hr flight from Minneapolis to Worthington in SW Minnesota just to have a McRib. I guess its another version of the $100 hamburger. What crazy excuses have the rest of you come up with to go flying.3 points
-
Carrying commercial non-owned coverage solidified my price increase from $40/hour to $50/hour in 2018. The demand for my CFI services dictated an increase to $60/hour for 2019. I'm flying enough that I've started turning down flying based on minimum aircraft standards. My first question: Does your aircraft have shoulder restraints?3 points
-
First formal IFR flight for the newly received ticket from KC Downtown to Cincinnnati Lunken. I enjoyed the smooth flight at 5000 while hearing the tin above asking for higher and lower because of constant chop.3 points
-
1.) the hard plastic for the Johnson Bar floor was original, at least for some of the earlier years. Most have been changed to carpet to make the installation look cleaner. Carpet sets (such as Airtex) have that center section included as part of the whole piece. The carpeting I s not difficult to replace. 3.) The Spatial Interior pieces really aren't made for pre-1965 Mooneys. The steel tube frame, especially under the rear windows, changed for the 1965 square windows. There is not a Spatial panel that includes the retractable step. This is not insurmountable, there is a guy here on Mooneyspace that has an electric replacement. @takair I installed as much of the Spatial system as would fit, but in the end that only came down to rear seat pieces and those fancy pockets. Everything else I did with Kydex sheet. I would not recommend the Spatial Interior for 1964 and earlier- but for the later modes it's fantastic.2 points
-
I had an EDM-930 installed a little over a year ago. I kept my factory senders since they were working well. They did have to be calibrated by draining the tanks and refilling in (IIRC) two gallon increments. On the ground or in straight-and-level they are pretty darn accurate when compared against the totalizer which is dead-nuts on.2 points
-
That price is crazy and I would not pay anybody that much I paid $3800 for my 900 and it took me (I am an A&P) 40 hours for a new install. The 900 will come with all new sensors which I would use. The additional cost are for new fuel hoses for the oil and fuel system components. I would do the install and have an IA that signed mine off if you wanted to bring the plane to AZ.2 points
-
The avionics shops are busy right now. Talk to a local A&P to do the install. Depending on how much free time you have he might let you work with him. Personally I would change out all the old sensors and wiring but many go against JPI’s recommendations and just reuse what’s there. edit: with a 4 cylinder engine I would replace the obs with the 900 in portrait.2 points
-
Have been interested in the questions you have posted and the answers Parker gave. Out of personal curiosity, and as a CFI, how many instructors have you found that fit your requirement set of not being on your insurance? Of those you have found, how much higher have their rates been usually? Are you verifing they have these extra coverages, or just chocking it up to their problem to ensure they are covered? I keep thinking about the crews I had come quote trees to cut down in my yard. There a ton of tree guys out there and a lot of them are doing it with no insurance. If I chock it up as their problem not mine, then I am only shooting myself in the foot when the defecation hits the oscillation, regardless if they are a close friend or random Craigslist contractor.2 points
-
Wife told me to take the boys to the Little Rock zoo, which was about 40 min drive into the city. We flew an hour to the Memphis zoo instead. First she was mad, then thought I was brilliant and then angry she didn’t get to go.2 points
-
Right! And rowing regatta in Saratoga Springs, NY today - and I'm flying over there in an hour or so to do it! I've done the head of the Charles but that one scares me a bit with all those turns and stone bridges - its kind of creepy going under low arched stone bridges at full race speed because remember you are going backwards rowing.2 points
-
Who needs an excuse?2 points
-
Night currency.... Went out to get it. Night flying is harder. 30% moon. Landing to the north. The decreasing energy to land for normal landing requires ground reference. Does not work at night. Have to revert back to standard pattern flying with square corners. Mostly a direct crosswind just to keep things fun. Barrelling down the runway for first take off thought was "This seems like a bad idea, what could go wrong" Did a touch and go. Survived it. Final evaluation. Pretty much suck at night flying.2 points
-
The company I work for just got a $M contract to build a machine to make the hooks for AmSafe! putting a lot of Chinese out of work!2 points
-
It’s pretty great when you can call Ken to fly the plane in AZ. Seller delivers to GGG for prebuy/annual. I never saw the plane till I picked it up. But I figured between you and Don I shouldn’t worry.2 points
-
One bounce followed by a good recovery is just fine. Going around has it's own complexities and while you should be comfortable with it, it's generally no problem to salvage the landing after a bounce. On the other hand, someone who bounces a second time, or third time, probably isn't salvaging anything and would be best to take it around and try again. But I think the Mooneys are easy to land. Finish up the hours for insurance and then get out there and work it out. You'll figure it out quickly and get really good at landing.2 points
-
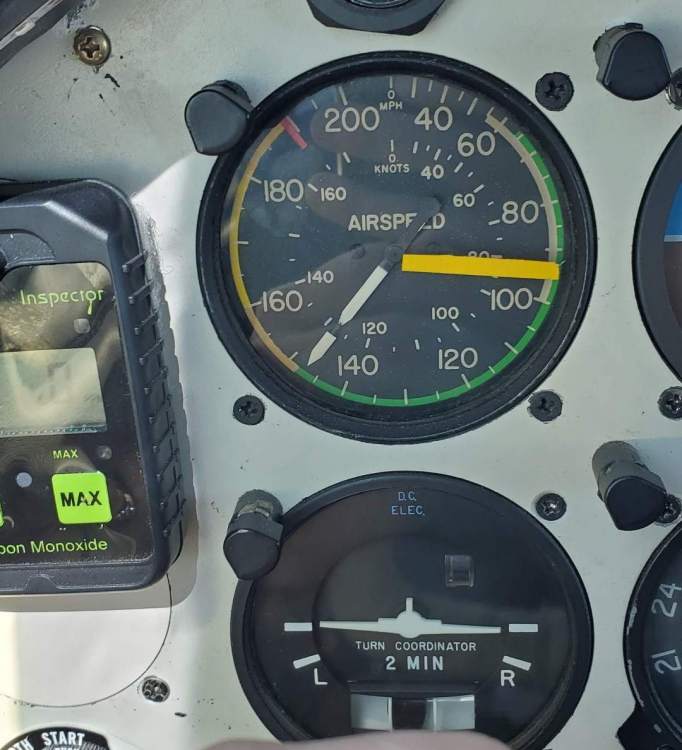
Harris Ranch - October 19, 2019 Great fun at the Harris Ranch fly-in for the West Coast Mooney Club. Got to meet a bunch of new folks and had one of my worst landings in a long time when the bottom fell out just before touchdown... @MrRodgers, thanks for organizing it, hope it's okay I stole your picture of the lunch. I told Richard Simile at the Mooney Summit I would put the tape on the ASI before flying again and there it is. I think I will replace it with a little thinner piece. (Stall speed of 67 x 1.404 = 94) If you don't know what the tape is for you need to watch the Youtube Video.
 2 points
 -
I added my CFI to my policy when I bought the plane and did the transition training. All it took was an email to my agent with his information and I received an email back with an attachment showing the change and no increase in premium. Later I sent another email and had him removed. I'm not sure what all the fuss over the last page or so of this thread is all about...2 points
-
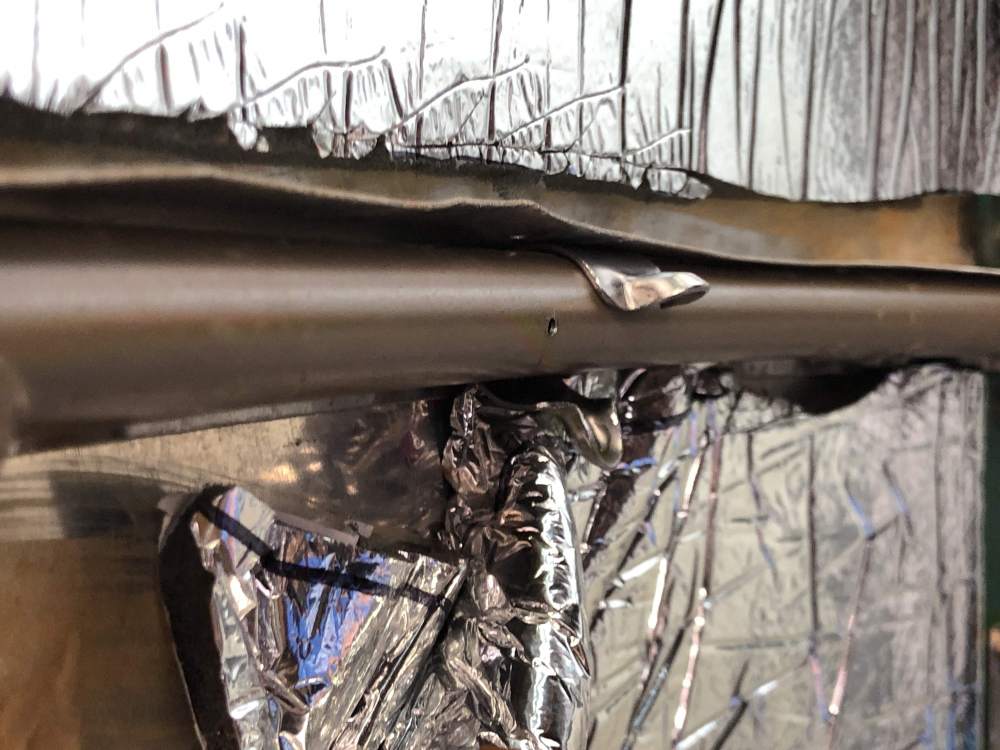
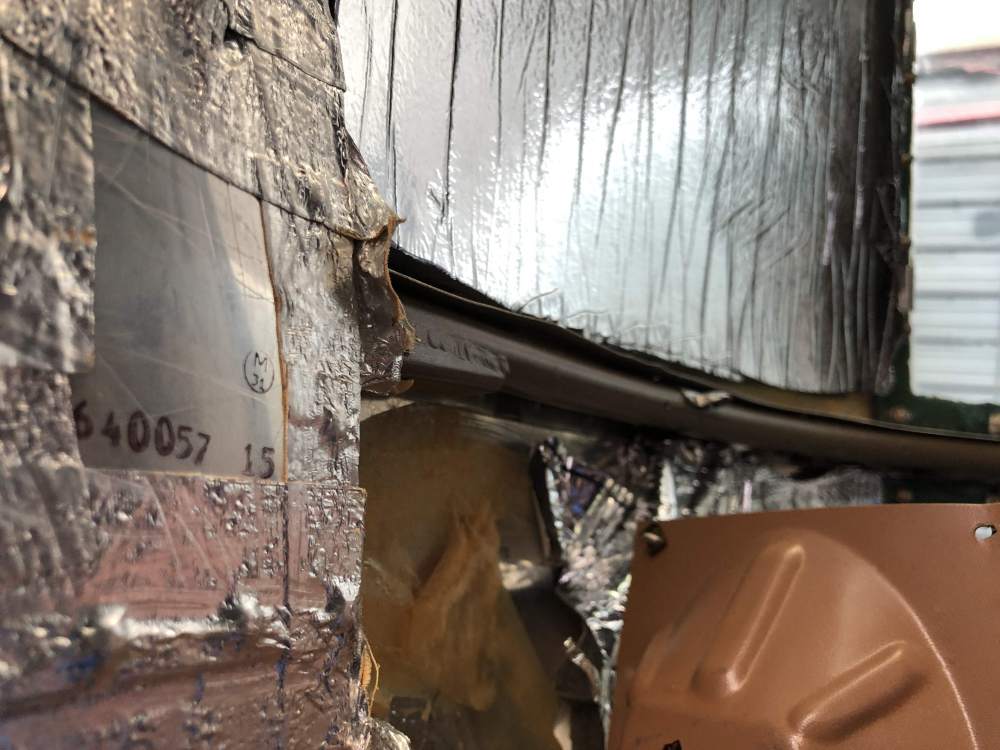
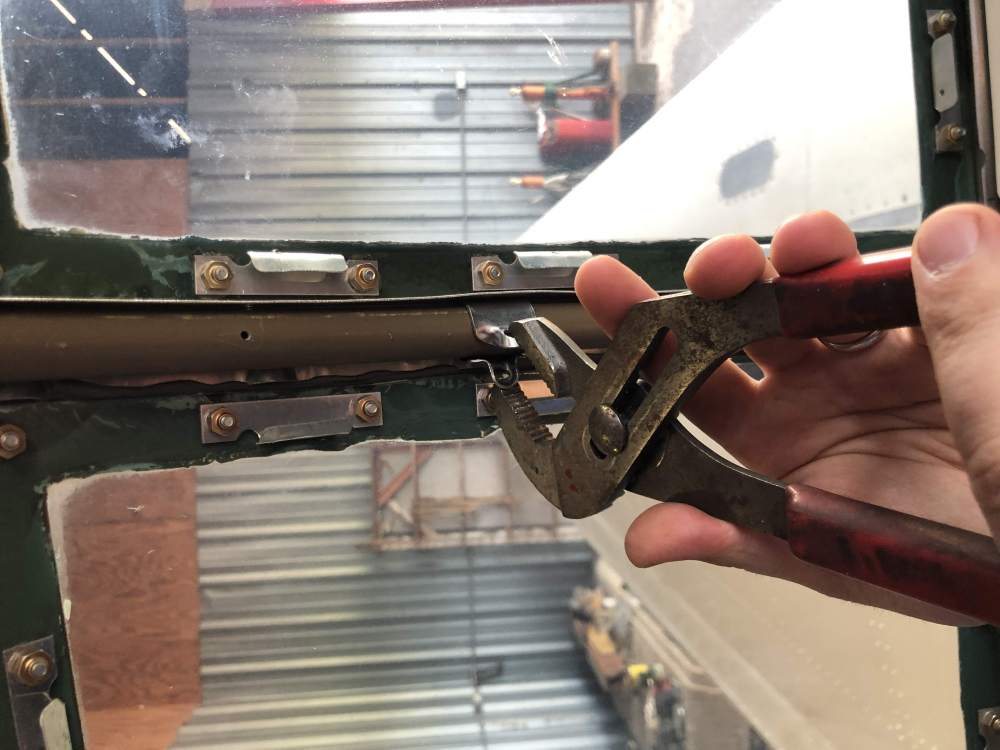
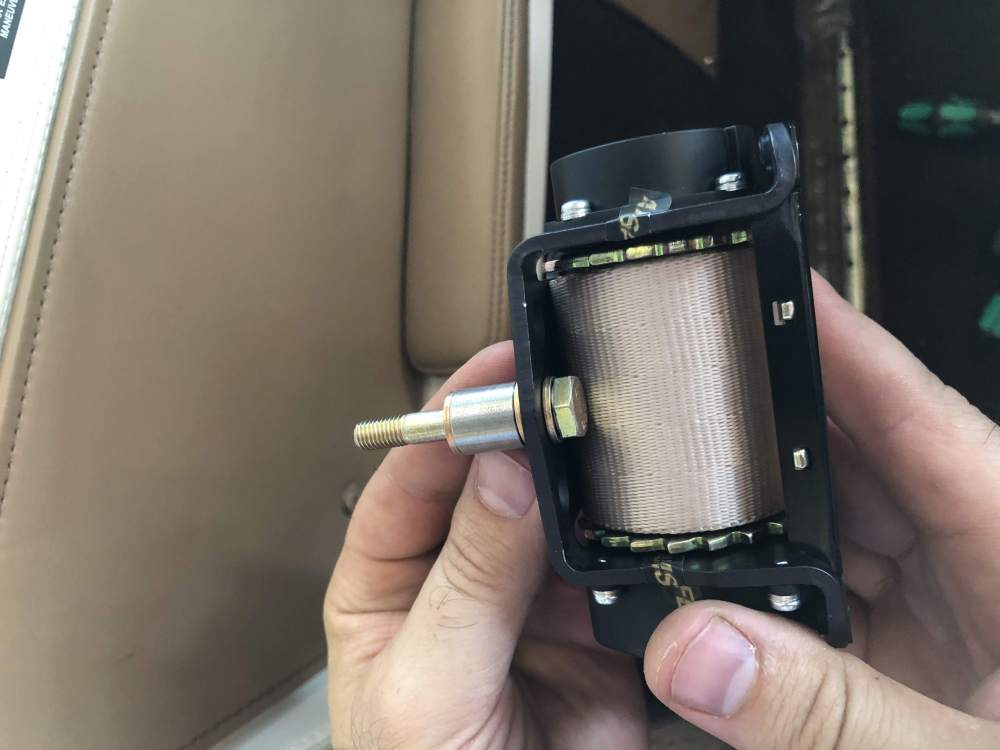
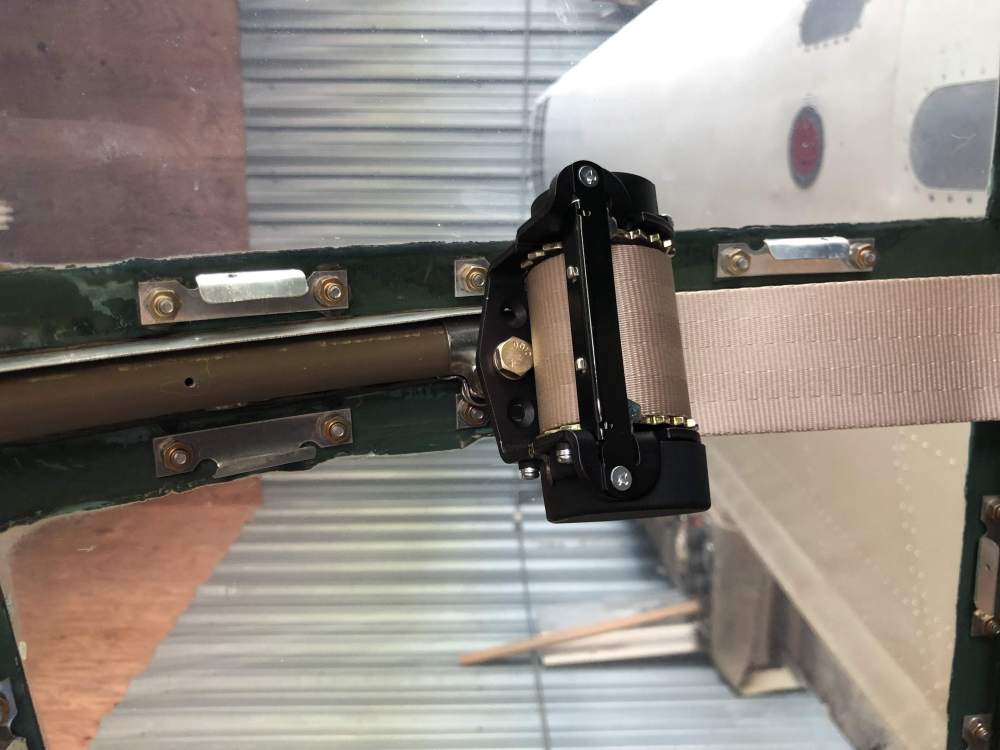
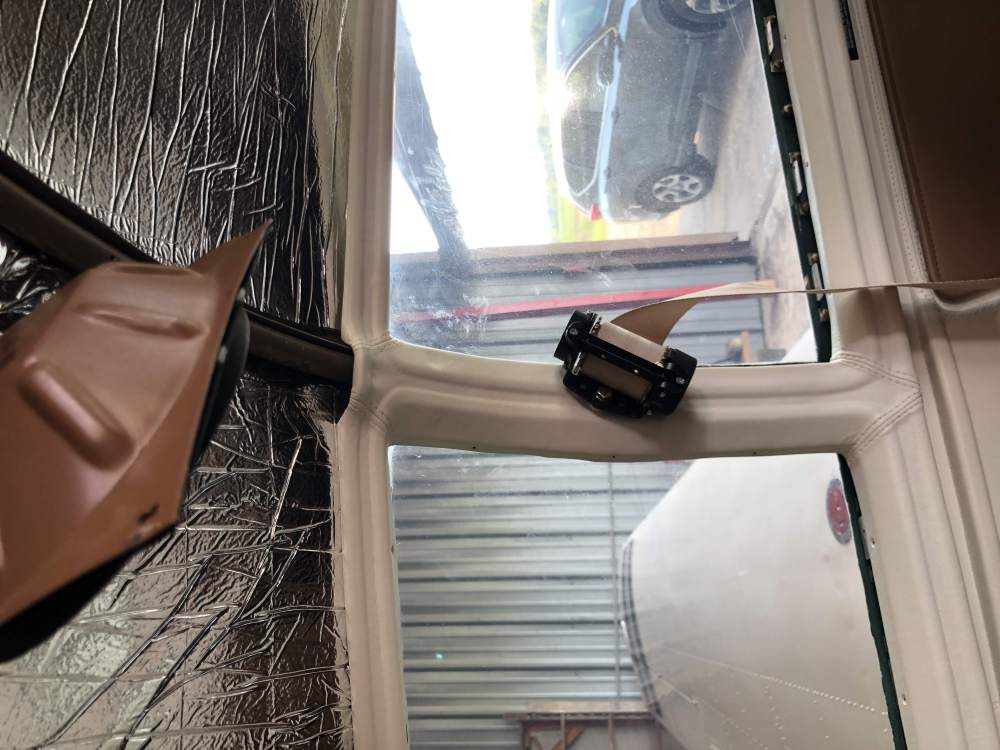
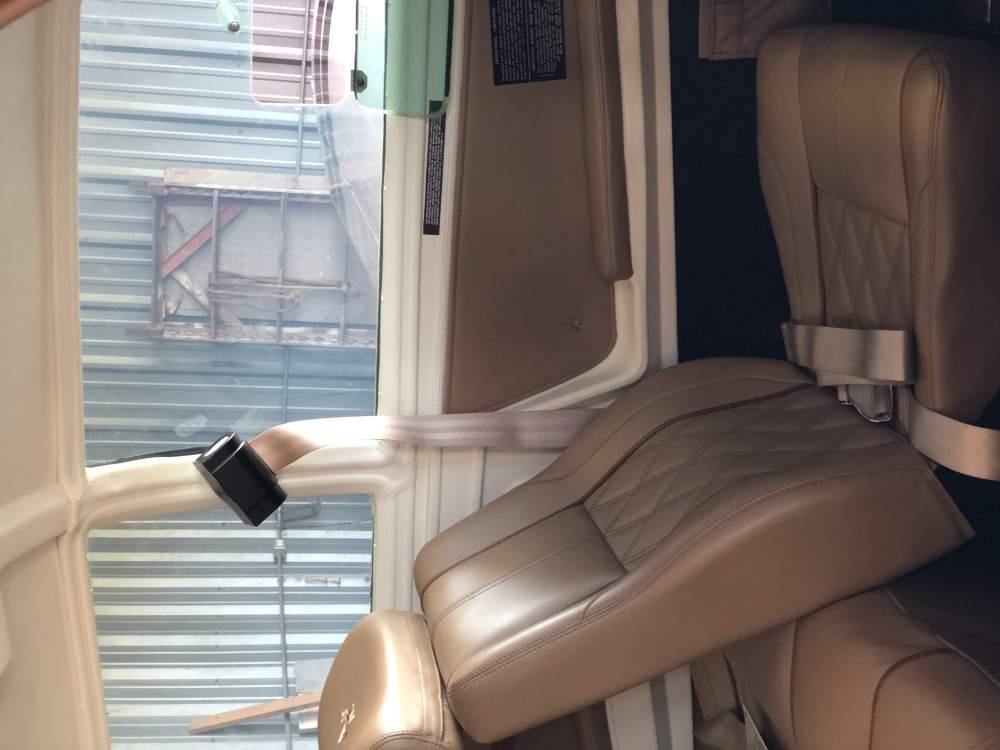
After reading through several of the posts on here on installing Shoulder Harnesses on an older short-body Mooney, I figured I'd give back to the community with our process on installing inertial reel shoulder harnesses on our 1965 Mooney M20E. Resources/Reference Threads Which kit we installed, and what to know before you order? We installed the inertial reel shoulder harnesses with lift-lever buckle release from Alpha Aviation: https://alphaaviation.com/mooney-m20-a-thru-k-front-inertial-reel-shoulder-lap-belt-replacement-upgrade-lift-lever-buckle/ . Can't say enough good things about them, they were extremely helpful over the phone and when we lost some of the washers in the included minor change kit (more on that later), they were kind enough to mail me a baggie full at no additional cost. Before you order, you need to know 3 things: What's the attachment point of the seatbelt to the airplane? There are two. Either it is bolted on where a bolt goes through to attach it to the airplane, or it's hooked on, where there's a metal hook clamp at the end of the lap belt that hooks into the metal ring on the seat. What colour do you want? Match the interior. We went with the Fawn, they look great! Push Button or Lift Lever? Personal preference. They say not to use the lift lever with the manual gear, however after a half dozen flights on ours with the Johnson bar I've never had it release on me or cause issues. Now the fun part - installing! Tools Needed: Masking Tape Set of wrenches, if I remember correctly, a 9/16ths and a 5/8ths is what we used the most Handy phillips head screwdriver Slack-jaw pliers Needle-nose pliers Socket head wrench for the bolt (or you can do it with a regular wrench) Cotter pins since you're removing the seat Drill with multiple bits (recommended a rotary ream) Overview Video IMG_2630.MOV Step One Remove the seats. You're going to need the access, and this makes it easier to unhook the old seatbelts anyways. Step Two Pray to Al that the engineers when assembling your particular Mooney gave you a little bit of clearance between the steel bars of the cage and the skin of the aircraft. Okay, now you're ready to get started. Do the pilot's side first, it's by far the hardest, and also the one you're most frequent to use. Step Three Remove the side-plastics on the side you're working on, for this guide, I'm going to focus on the Pilot's side as I recommend to do that one first. Remove the window surrounds - side plastics/paneling around the windows. Remove the headliner. Step Four Now the fun part. Take the clamp, and open the clamp up by inserting a screwdriver into each hole opposite of each other so they make an X, then push against them to open the clamp up so it will fit over the tube. You're going to need to install the clamp, included with the minor change kit, around the structural tube that runs in between the two windows with the flange & screw holes facing aft. This is murder. It is very hard to get the clamp on and turned around and took us probably 3-4 hours to do it. I wish I had advice for you, but there's not really any. What we did was used the needle nose pliers to hold the aluminum around the tube back and then just brute forced it on and kept pushing/turning, pushing/turning until it was where it needed to be. One thing that makes it a little easier - try to find the place with the most clearance between the skin of the aircraft and the tube. For us, it was at the top under the headliner. We worked it on there then just shimmied the clamp down. Step Five Once you finally have it turned around, align the clamp to the vertical midpoint of the two windows, then use those slack-jaw pliers to tighten the clamp. Step Six Now it's time to do a test fit. The minor change kit includes the bolt, washers, spacers, and nut that you'll need. They are going to go through the provided hole on the inertial reel box, then through the two holes on the clamp, affixing the nut on the end of the bolt (spoiler alert: tightening the bolt on to that nut is like doing open heart surgery with swiss army knife tweezers), like so. Step Seven Do a test fit with the bolt through the clamp holes. Is the clamp in the right position or is it too high/too low? Step Eight Take the plastic window surrounds you removed earlier and line it up with the bolt holes on the clamp to determine where you need to drill the hole for the bolt to go through the plastic and into the clamp. It's more of an art than a science and requires some eye-balling. Mask off the hole, then use your drill & rotary ream to drill a hole big enough for the bolt to go through in the plastic window surrounds. Step Nine Make a blood sacrifice to Al. This part took us the longest. You're going to have to put the bolt through the inertial reel box, through the plastic window surrounds, through the bolt holes of the clamp, and hold the nut at the end of the clamp in place while you tighten the bolt on. Congratulations, you've got about an inch and a quarter to work with to hold it in place, and I hope you're instrument rated because you're not going to be able to see anything as the plastic is covering it. We tried several methods to do this, including using masking tape to tape the nut to the wrench itself but no matter how tightly we got it, it never was enough to hold tension for the bolt to start to thread through. Good luck, and may the Mooney gods be with you. Step Ten Once that's on, torque it to the appropriate setting (I want to say it was 70 or 90 inch pounds) and put the plastic cover back on the inertial reel. Step Eleven Reinstall the headliner, plastics, etc. into place. Step Twelve Reinstall the seat, install new cotter pin, and install the lap belt back on to the seat, then do a test fit. Crack open a cold one, sit back and admire your work, and look at your watch as you realize that just took you almost a full day. I hope you found this helpful, this was not a fun process, but I will say the passenger's side is much easier (a lot more clearance, and you can actually see!) and rest knowing your flying now just became a lot safer. Apologies for the sideways pictures, they are right side up on my computer but inserting rotated...
 1 point
 -
Back in the fall, a thread was started about an MT Propellers. Back then I had one on order for my Bravo. I promised I would give a pirep when I got it installed. I ordered the prop right after OSH and it arrived about Christmas. I needed to help a friend in Titusville so I decided to stop in Deland and have them install and balance the prop. Long story about install but I will save that for another day. Since the install I have been to KTIX, M54 (Nashville) and back to Denver and done some local flying. My impressions so far are The prop (a four blade) is extremely smooth. One reason I wanted to do this is that after 3.5 hours behind the Mc Cauley I needed to get on the ground for a spell. The vibration was fatiguing and I often do long trips and I need 4-4.5 hour legs. On the way home from Florida I did 4+ hour legs without difficulty. The four blade MT is about 2" shorter than the McCauley. It makes the cabin much quieter. In fact I am very comfortable flying without a headset. Since I like background music I still wear the headset a lot. I found takeoff runs shorter and the climb rate better. I also found I need to keep the taxi RPM down to 800 or lower or get going to fast. Landing is different, I think due to blade drag and the lighter prop. The airplane seems to float less and decelerates faster which I rate as a positive factor. I find I can hold the nose up longer as the tail has less weight to lift. I have not put this to the ultimate test as yet. The test will be a full load of fuel and two fat boys in the front seats. The Bravo now handles much more like a K model. The ride in turbulence is a little less desirable than it used to be. With the heavy prop. the Bravo would really plow through the bumps. It now bounces a bit more. Cruise speed I am still working on. I normally use 28/2300 and a fuel flow of 15.5. When the MT was set to that power I got the same indicated airspeed at lower altitudes (under 10K). Since the prop is shorter I tried 29/2400 and found that the fuel flow was higher and the plane was a little faster and the gas mileage only decreased 3%. I also tried 32/2200, fuel flow about 17.5gph. The result was a good 5% higher indicated over the McCauley and the gas mileage was about the same or a little better. The percent power however is 81%. When the weather gets warmer I will get an idea if the engine cooling is improved. I think it might be. Well that is about as much as I have observed so far. I see improvement in all the areas that I deemed important when I ordered the prop. Not large improvements but certainly worthwhile improvements. The only potential problem is that to pour enough TKS fluid over the prop blades they increased the flow which seems to cheat the flow to the wings. I only flew in a little ice so I need to evaluate this a little more. One other thing I have found more difficult is trying to install the lower cowling. A few more practice sessions may improve my skill at this.1 point
-
So I’ve been trying to get my local avionics shop in Spokane, WA to commit to doing a dual G5 install within the next couple months. They must be completely overwhelmed with work right now because they won’t even answer back at this point. I’m thinking of tackling the G5 ADI by myself while the airplane is in annual in December and have my IA sign it off. At least then I can have him remove the vacuum system (adi is the last thing I have using vac). So, despite my mechanical engineering degree, I have limited hands on mechanical skills and there’s a reason I’m a pilot and not a mechanic. Is there any part of the installation that gets tricky? I’d like to use my GNS430 as the gps source. How hard is wiring the new breaker? What about leveling and doing the rest of the checkout? If it’s doable, how long should a rookie allocate?1 point
-
I started following Mooneyspace back around 2010. I was in between Mooneys and followed Parker's 201 and later his 252 with great interest. I got more active when I bought another Mooney in 2014. In times over a 20+ year period I had bought insurance through the AOPA agency, feeling that they were doing the best job of shopping rates for me and presenting options, which I feel that they were back then. I didn't get that feeling in 2014 so I switched to Falcon and really have no complaints, other than that I would send in my annual info in September and would have liked my quotes earlier. Earlier in 2019 when I heard that Parker was going to be an option I planned on getting him to quote me this fall. I met him and his wife in April at Sun N Fun and everything I had heard was true - very sincere, honest people. I let him know when my policy was due and he reached out a few weeks ago. I'm glad I switched. Outstanding experience! Very knowledgeable, very responsive. A huge plus is that he speaks "Mooney". This is an unsolicited endorsement - but give @Parker_Woodruff a shot at your business - you won't be disappointed.1 point
-
@AGL Aviation for sure. They do really solid work. Lynn is a superb mooney mechanic and works closely with Don Maxwell. I would avoid central Virginia based on shared experiences. Weber does good work too. They did my control surface reskinning.1 point
-
Appreciate all of the help! I’m curious about the vinyl Flooring option. I will look to see if I can find plastic replacement for the wheel well so that I don’t have vinyl flooring with carpet wheel well. The gentleman above mentioned that Jeager interiors are made for 65 or 66 and newer and he doesn’t believe they will fit the round windows in the rear. I’ll have to call them to see what they think. It sounds like I might have to piece together pieces from here and there to get the outcome I am looking for, unless I have someone make custom panels, which seems much more expensive.1 point
-
For floor carpeting... all short bodies will be near identical... SCS is the much higher quality product... where $400 is a bit rich for the ordinary Cheap Bas... I have not seen the vinyl flooring product used in a Mooney... Somewhere in my flying days... I got shoes that are better for rudder pedals but are crummy for walking around... they live in the plane... I went with brown nylon carpet from airtex... two kids and juice boxes were the norm... If this is a forever-plane... SCS and A Spatial Interior... looks like a new plane when finished. We have contacts for SCS and Spatial around MS... Best regards, -a-1 point
-
It is my airplane so my ocd was high. This was for a complete remove off all the old gauges and blanking them off. Closing the holes on the firewall and the calibrating the fuel tanks as well. sometime went into the proper hose runs and placement so it was clean looking and reduced the amount of fittings and such. In your case, they can rerun all the same wires in the same locations as long as the first install was good and reduce the time a bit. If you can find an A&P to do it, it will probably be at least half the rate of a shop and work with him and learn some more about your airplane. you can go get online and read the JPi900 install manual if you are curious what goes all i to it.1 point
-
I recently had a JPI 900 installed and it cost me ~5k. This included a new co-pilot panel; removal of RMI, LORAN, garwin cluster, MP and FF too; new weight and balance whole lot of rewiring existing NAPA quality work... I did have the CIES sensors installed as well. Calbration was easy. I actually redid the calibration work as the A&P insisted that the 26 gallon tank had 2 gallons unusable which led to fuel quantity mismatches. I ran a tank dry and calibrated it from zero. Hope that helps. Cheers, brian1 point
-
Ideally, you want servo startup voltage below 1V. Mine was it 2.5V and I just had it overhauled, it fixed a lot of the slow response or non-responsiveness I had.1 point
-
30 min to half moon bay for crab sandwiches at ketch Joann at the harbor1 point
-
$2k-$3k is in line with what I'm paying for my '79 K (hull value a tad higher - but was told by a broker that premium goes up ~$250 for every $10k increase in hull value). Time in type makes a difference - got a little discount (can't remember how much, maybe 5%?) with Avemco just for having 5 hours in make/model, then another little discount for complex time, then another for IR... Avemco also told me once I have 50 hours on my plane, to call them and reassess - they said I could get another 8-10% discount for that. By the way - I also spoke to AOPA about it, and the agent told me straight up "If you bought a 182 instead, you'd be paying $900 for the same policy. RG insurance premiums shot up in the past couple of years". I told him "yeah, but then I'd be flying a 182...". He laughed.1 point
-
Only place you can have all 4 seasons in one day1 point
-
I flew over an hour South to West Branch, MI one Summer Sunday evening to go to the Eddie Bauer outlet store. Little did I know that I had arrived about ten minutes too late before the store closed (I didn't realize it was a Sunday). That was a $100 nothing-burger and I felt like a fool. I would have rather have enjoyed a nice simulated ribmeat sandwich.1 point
-
I did the test flight for Parker when he was looking to buy his 252.1 point
-
The CA Franchise tax board makes the IRS look like a bunch amateurs. These are not people you want to tick off.1 point
-
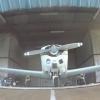
Looks like a distorted photoshop. the plane seems bigger than the buildings.1 point
-
Congrats on your new bird, I’ve as you say “stone skipped” mine a few times and I’m sure there will be more to come, Mooney’s like numbers and like to fly. I fly both a Mooney and 172 and sight picture will get ya1 point
-
If the devil is in the details, @M20Doc is the devil! How the heck do you remember stuff like that? I'm glad we have you around!1 point
-
Excellent choice in the J. During my transition training I was told "if you ever bounce a Mooney add full power-go around." I strictly adhere to that advice. To each his own, but I would think after a bounce your first instinct should be Cram Climb Clean and go around, if it's I am going to wait for her to settle, you may run out of Rnwy or be unable to clear an obstacle cause of the delay in initiating the go around. In 2016 at Sky Manor A J pilot bounced his J 2 or 3 times before he initiated his go around, it ended tragically he was unable to clear the trees at the DER. If just a baby bump and easily corrected then that's different.1 point
-
I didn't like the curved windows at first. but I saw a photo of my aircraft in flight, and saw how the curved windows reflected the curved lines in back. it really is quite lovely. Now I like it just fine.1 point
-
With the curved rear windows, can’t disagree with you there. So get a 1964 model, the last year with the curved windows.1 point
-
I was visiting my daughter in Boston this weekend. Sunday was nice day so we took a trip to Bar Harbor, Maine (KBHB) for the afternoon. This was my first time visiting and it was a great time of year to do it. Bradb 2006 Meridian N951TB (former Acclaim)


 1 point
 -
When I had an issue with one of the first GFC 500 installs on my M model, Garmin went out of their way to assist me in solving the problem, including allowing me to visit them on the way to Oshkosh last year. They found the problem in less than 5 minutes after opening up the avionics bay in the back of the plane. While almost everyone on their team had left for Oshkosh, an approval letter was generated for a required change to the installation that allowed the airplane to be returned to service. I was on pins and needles for most of a day, but the letter was received by the shop at 4:30 in the afternoon of the last day we were to remain in Olathe. Also, after a year and a half, the display on the TXi decided to go bonkers. I had a replacement in 2 days. So I have found Garmin service to be impeccable. Your situation is rather unique. Who ever heard of a tail from a different model Mooney being used as a replacement for the original? After talking with the flight test pilot who helped certify my model Mooney, I found that the testing for approval of an autopilot for a specific model aircraft is significant: weight variations from light to gross, CG variations from forward to rearward, altitude variations from low to max altitude, speed variations from slow to fast, etc. The expectation that Garmin would risk approval on a "one off" in the situation of a different tail assembly, I think is unrealistic. The problem lies with shop that had the temerity of replacing one model's tail with another model's tail. And why didn't the prebuy find that issue? This whole situation I find incredible.1 point
-
Nose over and bombs away!1 point
-
What I learned from my experience was to be very explicit with my communication, ask questions, and verify that there is full and unequivocal understanding between me and the shop before leaving my airplane in their hands. We humans read between the lines so well, that we often mistake it for actual text. Obviously there was miscommunication. I'm just saying it's easier for me to take personal responsibility for the miscommunication and learn from it rather than try to enforce different behavior on someone else. I can try to "teach the shop a lesson" but chances are all I'll accomplish is ensuring that shop will never have time for my plane ever again. In all of this, I'm assuming the shop was not intentionally trying to "rip off" the OP. But rather was following what they assumed were instructions they were given. We don't have the shop's side of the story here. But regardless, if it was miscommunication, the OP should learn to communicate better. If the shop was intentionally trying to sneak one past the customer, then the OP will learn to do better due diligence on the shop before retaining them to do work and also to pay closer attention to the work being done, stop by periodically, chat about the other planes, what's being done, etc. In either situation, the OP is unlikely to affect any change in the shop. But he certainly can and has learned from this experience.1 point
-
If the old glass was cloudy or had crazing, it would not pass annual. Nor would the window with the hole in it. So if you said to annual it, even just make it legal and no more, and the windows weren't legal, I wouldn't be surprised that they got replaced without asking. So maybe he assumed, and you assumed? And here you are. This is the most common problem in the business, is too many assumptions and not enough actual communication. Always better to lay out the expectations before any work begins.1 point
-
The NTSB Report always start with "No Flight Plan was filed" so they believe it is a contributing factor to crashes.1 point
-
If you need the pump, you might consider replacing it. If it gets any oil contamination, it won't last long. From Rapco's website: Q: With my engine at idle, the vacuum gauge reads zero, but as the engine RPM is increased, the gauge will indicate vacuum. What causes this? A: The cause for this symptom is most likely the carbon vanes sticking in the rotor slots due to an oil or solvent entering the pump. A leaking (Garlock) oil seal in the accessory drive case can cause this as well as the engine being washed with an oil based solvent without having the pump completely covered. Both of these fluids will work their way into the pump, mix with the carbon dust, and turn into a paste like substance. Dry Air Pumps MUST remain DRY or their life expectancy will be cut extremely short. Inside each pump is a carbon rotor with vanes inside its slots. Centrifugal force slings these vanes out and against the Mil-Spec coated cavity walls moving air and creating vacuum or pressure. During this process, graphite dust is created as the vanes wear and helps keep everything in the pump moving freely. That is until the graphite dust is introduced to a fluid or moisture that creates the paste like substance, sticks the vanes in the slots and does not allow them to move freely and push or pull air until higher RPMS puts greater force on them to do so.1 point
-
Yes, we’ve scoped, done compressions. It’s dry inside. Compressions are good. Everything forward of the divider is clean. Through a process of elimination we’ve arrived at the Garlock seal at the vacuum pump. Also evidenced by a rotary spray pattern on the top cowling that gets distributed a bit by the intercooler flow. Hopefully this fixes it and the pump lasts a bit afterwards too. Sent from my iPhone using Tapatalk1 point
-
Here is an update from a little over a 100Hrs of use. After a few oil changes and an annual I have found a way to put the lower cowl on without too much hassle. You have to put the front up in place before putting the rear in place. It is definitely more difficult with the extra blade but doable. In the hot summer weather the takeoff performance is better than with the 3 blade. Initial climb is better but to get improved climb performance you need to climb at 80-85kts or so. The oil temperature quickly rises so I have found that you have to push over and get the airspeed up to 110IAS or so. The result is only a slight gain in climb rate. Overall I really like the prop. The best like is the smoothness. The second the ability to flare near stall and keep the nose wheel off the runway. The third is the quieter ride. I doubt the cruise is any better but to make MT happy I might report a one knot increase. I used to set the power at 28/2300. I have been using 29- 30/2200 with the 4 blade. Passenger comments so far give high marks to the smoothness and lower racket level in the cabin. The only problem so far is the tow bar. I need to bend over a little farther so the bar will not bump one of the blades during turns. This could be a problem when being tugged. So far the tugs have had the tow ball mounted low enough that it has not been problem. One other nit is taxi RPM needs to be kept around 700-800. Not much of a problem as along the mags are in good shape and you have the engine leaned out. Well, That is about as much as comes to mind.1 point