Leaderboard


Popular Content
Showing content with the highest reputation on 10/18/2019 in all areas
-
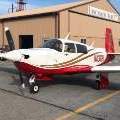
I have been considering a "GIII", but that would be Glasair, not Gulfstream . Most of my consulting is KHAE to the LA area and it is just tooo far for the "F" to usefully get there. Regarding the other kind of "GIII," the more immediate reason for selling the aircraft is to partly finance a prototype build-out for a new big data technology that I have been patenting that compliments current AI (machine/deep learning) technology. The big goal is to ultimately make predictive, prescriptive, root-cause and other advanced analytics tasks far more accurate and also easier for people who don't have a PHD in data science (and of course those that do) to do. I have a couple of large (Fortune) organizations interested if I am successful so, even though I **hate** to sell my Mooney, I'm going to go for it.7 points
-
With the leaves are falling as fast as the temperature we are getting into cabin heat season again. AOPA has published an interview with fellow MooneySpace user Dan Bass @DanM20C where he recounts how he survived the crash of his M20C after becoming incapacitated by Carbon Monoxide. Now is a great time remind everyone to invest in a CO detector, your life could depend on it. https://www.aopa.org/training-and-safety/online-learning/real-pilot-stories/dan-bass-accident-photos4 points
-
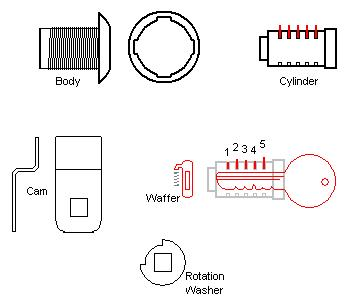
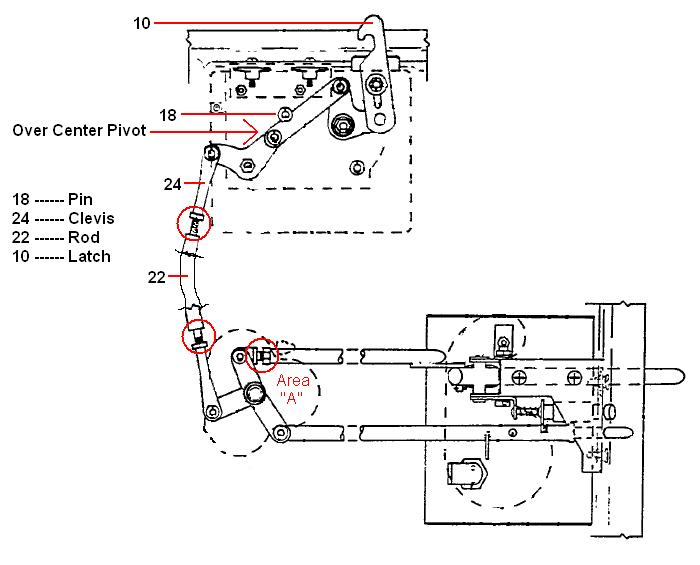
After putting it off for several years I finally decided to adjust the cabin door, it now has a very positive over-center and holds the top latch secure. Since I’ve owned my Mooney the door has never really had a positive feel when rotating the interior handle forward to latch the door closed and the exterior handle always stuck out farther than I thought it should have. I’ve never had the door come open in flight but I did get a ton of wind noise around the top of the door. Another thing that I didn’t like was having separate keys for Ignition switch, Cabin Door and Baggage Door. I didn’t take any photos but I do have the drawing out of the Parts Catalog along with a few I did for replacing the Door locks. The following drawing is from the 1965~1967 M20C, 1965~1966 M20D, 1965~1967 M20E and 1967 M20F Parts Catalog. The first thing was to remove the plastic cover from the cabin door, and in typical Mooney fashion I ended up with a pile of screws. After the cover was removed and the door open I was able to find part of the problem, there was pink fiberglass insulation packed in and around the interior door handle up inside the door (Area “A”). Once the insulation was removed rotating the interior handle forward felt a lot more positive but still no over-center that I could tell. I knew my top latch needed adjusting due to the wind noise so I started there. The upper latch assembly (#6) comes out as a unit, start by loosening the jam nut on the clevis (#24), then remove the small screws that holds the assembly in place, there are 2 machine screws that come in from the top. Care should be taken when removing the cotter, washer and clevis pin from #24, don’t drop them in the door. Once the latch assembly was out I got a better idea as how it all worked, item #18 is a stop, keeping it from going to far over-center. I turned # 24 2 full turns in (shorter) and re-installed the assembly (#6). I could now feel in the handle it going over-center but it was more pressure than I liked. Removing #6 and turning #24 in 2 more turns did the trick. The interior handle now has a positive lock and the outside handle fits nicely with the door. With the door closed and latched I wasn’t able to pry the top of the door away with my finger tips as before and it felt very secure. The next thing was to look at the locks for the Cabin & Baggage doors. Ideally I want just 1 Key that works the Ignition and both door locks. I removed the lock assemblies from the doors but was unable to remove the cylinders to key them the same as the ignition. I stopped by a local Locksmith shop to see if they had any lock assemblies that could be keyed to my ignition key but they had just sold all 20 something they had in stock (figures). I stopped by Lowe’s to see what they had but no joy, Home Depot was my next stop and it was a score, Gate House # 0252974 looked like they would foot the bill but I wanted to make sure my original Bendix ign. key would fit the new locks. A clerk came by and asked if I needed help and told him I want to see if this key fit in that lock, he opened that package and the key went right in, plus the key cut was very close to mine. Once home I removed the cam which allowed the cylinder to be removed from the body. The way most locks work is the body of the lock has a keyway (these have 4) and the wafers/pins are spring loaded into that keyway, keeping the cylinder from turning (unlocking), when the key is inserted into the cylinder the cut of the key allows the wafers/pins to be pulled into the cylinder out of the keyway which allows the cylinder to turn. These were never meant to be re-keyed and the wafers were not removable. By inserting my ignition key in the cylinder I could see which wafers stuck up past the cylinder. The drawing below shows what I’m talking about. The wafers are brass and easily filed down to the radius of the cylinder allowing it to rotate in the body. Filing is done with the key inserted (fully), once they are filed down insert the cylinder with the key installed and check that it rotates freely in both directions completely. Once all the filing is done clean out all the metal filings and reassemble. I had to modify the cams to match the originals but its fairly straightforward looking at them side by side. Pay close attention to your old locks on orientation in the locked and un-locked positions, the new locks can be set by how the “Rotation Washer” is installed. Once I had both new locks keyed and correct (after a test fit & try) the cam is held on with a screw, which was removed and installed back with thread locker (loctite). As an added measure once the locks were in place and tightened I verified that they worked as needed, I then added several dabs of RTV on the nut/body/door skin and the screw/cam for safety. I now have 1 key that works the ignition switch and both door locks……..Hope I explained this well enough and if not shoot me a message and I’ll try to explain it better.

 2 points
 -
I just forwarded on Dan's story to the 57 pilots in our local aviators association. Hopefully a few of them will pay heed to the warning!2 points
-
So I went flying with a friend of mine last weekend. He owns a 2006 Cessna 172. As I started to climb into the right seat, I noticed the little cardboard CO detector stuck to the panel. I asked him to wait two minutes while I went over to my hangar and pulled the SensorCon out of my Mooney. I just clipped it to my jacket and climbed into his airplane. We had a great flight, and it was fun to be back in a little high wing after quite a few years. Of course he asked why the concern over the CO detector and so I related Dan's story. He ordered one the next day.2 points
-
Thanks @StevenL757 and @RLCarter, I plan on tracing it but out of curiosity wanted to see if it was familiar to anyone since it's so different from any of the other wires coming out of the firewall.2 points
-
Best thing would be trace the wire and see what it goes to in the engine compartment (easiest) and go from there. It seems to be common practice to cut wires and leave them in place for some reason. By chance is the wire labeled (printed) as to what it is? Might have to check along the length to see2 points
-
I just located 1 hole carefully and then put painters tape around the perimeter then marked holes and then moved the tape to locate the holes to the new plastic2 points
-
Because I am a business and commercial operators are discouraged from selling stuff here. The forum is for individuals. I'm good with it. I respect the system. I have tons of parts I would like to sell, but that is specifically prohibited.2 points
-
Borescope up the tailpipe... Mooney colonoscopy?2 points
-
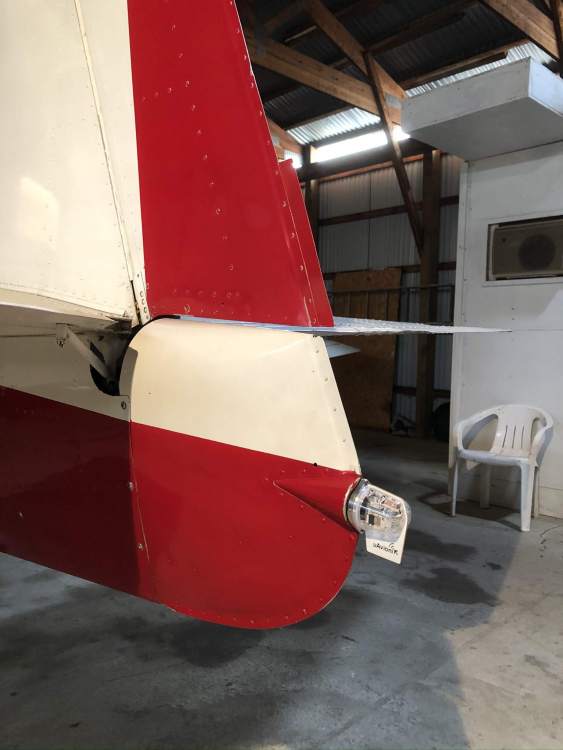
I ordered my Tailbeacon from Chase at Avionics Source (he’s a great guy to deal with) and received it about a week after the STC had been approved. I contacted one of the Uavionix Qualified installers listed at my home airport to install. Installation went quick and easy except we had to substitute a #6 screw for the top mounting screw as the #4 was stripped out. The A&P placed the ground wire under a mounting screw, but it works fine. (if the ground was good enough for the original incandescent nav light, shouldn’t it be fine for the Tailbeacon?) Unfortunately, that first Tailbeacon apparently had a defective barometric pressure sensor. Uavionix quickly shipped me a new Tailbeacon and the replacement works correctly. I made a short flight and got and printed my PAPR with no discrepancies. This couldn’t have been easier!
 2 points
 -
I tried to be fancy by transcribing the holes and failed. Gave up and just drilled new holes.2 points
-
Flame tubes... are at the center of the muffler in direct contact with the super heated exhaust streams leaving the engine... they help complete the burning of leftover fuel components... and keep the hottest gasses away from the exhaust system walls as they cool adiabatically... (expansion of gas) 1) they last eons... normally. 2) susceptible to poor heat management, high EGTs... 3) When they devolve, they have a tendency to send the hotspots to other parts of the exhaust system... 4) The other parts of the exhaust system can fail at a high rate... breaking welds. 5) The Heat muff surrounds this part of the muffler... 6) inspection is usually done externally at annual... by disassembling the heat muff... 7) A few MSers have taken pictures using a dental camera... from the inside... 8) @Frozen Flying recently posted a great pic of a failing exhaust system weld... 9) Costs are typically replacing the muffler via OH using one of three aviation welding companies... 10) The higher limit on price is purchasing a PF exhaust system... 11) if you see mangled, bent, heat damaged, parts inside the muffler... these are probably signs of the flame tubes failing... PP notes regarding flame tubes... things I learned around MS... not a mechanic. Best regards, -a-2 points
-
Bob Kromer said the factory installed a torque measuring device between the propeller and the crankshaft and found that the place where the engine torque went from positive to negative was around 15 inches MP (if my memory is working correctly).2 points
-
My favorite placard on an experimental. After the required caution was added, "No manufacturer can afford this level of quality." That doesn't negate your caution.1 point
-
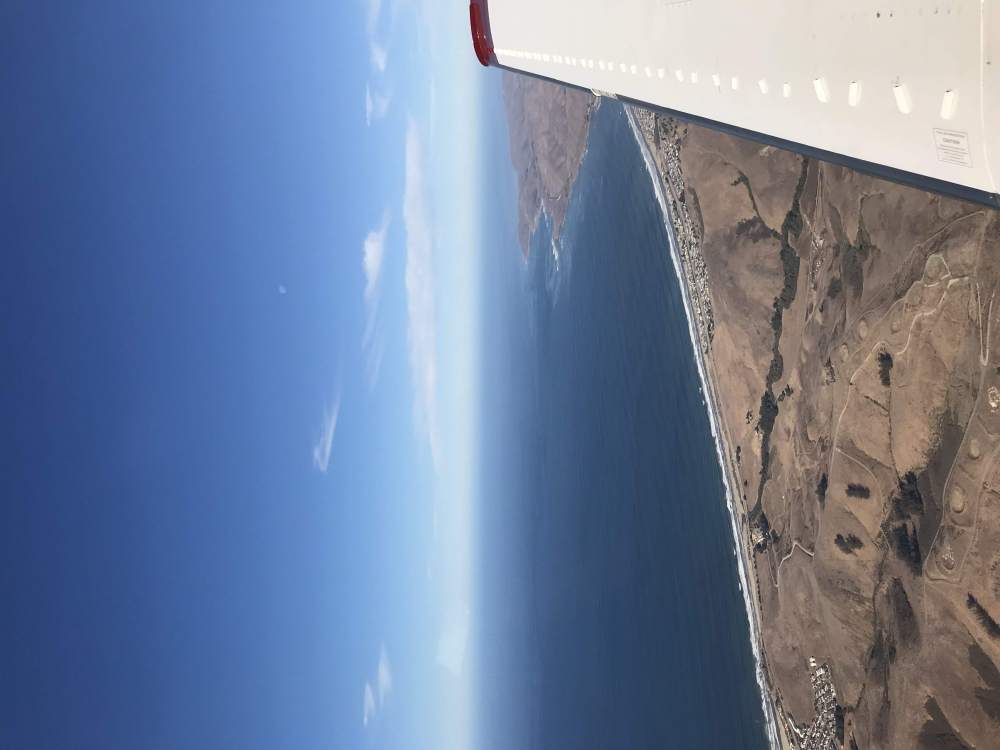
Beautiful day today! Can’t say I notice any difference in cruise speed with the VGs but it definitely makes crosswind landings easier! Winds over the hills were from the north at 30 knots and surface winds were from the west at 8. Instead of dropping in over the hills I decided to go out over Morro Bay and had a smooth pattern entry and landing. A 310 right behind me went over the mountains for a right downwind and reported severe turbulence (after he put his headset back on). I’d told my passenger beforehand that we were going to descend over the water to avoid the wind shear and when he heard the PIREP he asked “why did he do that if he knew it was going to be so turbulent?” Good question. Seems like a great reminder that plotting the course in foreflight isn’t enough, we still have to pay attention to the local terrain and winds.

 1 point
 -
So proud.
 1 point
 -
Thanks for sharing Dan! @DanM20C1 point
-
I had a CO incident back in the 80s In my M20 F. I was flying IFR from Denver to Rapid City SD. It was the middle of winter and the OAT was about -20C. I was on top and after a while the clouds were so bright that my eyes hurt. Then I started to get a splitting headache. When I was done with my work in SD I bought a pair of cheap sun glasses. When I got back to the airport it occurred to me that I might have a CO problem. I bought a CO spot detector at the FBO, started up the engine and put the spot in front of the heater duct. It turned dark black in about 2 seconds!!! Being young and foolish I flew home with my jacket zipped up, my winter gloves on, the heater off and the overhead vents on full blast. It is hard to pass out when you are shivering that bad. I felt like I had the worst hangover for 3 days. My muffler has a split that went half way around the muffler. It was about 1/8 inch wide.1 point
-
I agree with the more refined look of a darker panel. I think the black panels like mine got a bad rap because over the years they got frankensteined with avionics being pulled and new stuff being added. In addition, there was a time period where they were using a Naugahyde material to cover the panel. It just made for a sloppy look. I like my black panel. Circa 2001: Circa 2017:1 point
-
It looks cut not pulled part. Cant tell on this small screen but the circle in upper left is the other end?1 point
-
Darker tones wont reflect sun rays and look more refined. Do what makes you happy though, all else being equal, I personally wouldn't exclude a buy decision based on panel color alone, unless it was awful.1 point
-
I just laid the old panel inside the new one and marked the fore/aft position of the holes .... then I allowed for the right/left offset caused by having them inside each other and drilled away. Worked fine ... I don't remember having any holes that required elongation.1 point
-
Thanks mike. it’s been great to me too, and I maintain it the same way. if I could keep my kids little I wouldn’t sell it!1 point
-
Take it easy on the little fella. I suspect the one plane he flew in had a relief tube so he thinks all of them have them. Or maybe they do and the 1000 or so I’ve looked at or flown in we’re just oddballs and didnt have them. Somebody should send a memo to cirrus, Mooney, beech, diamond, piper and Cessna and tell them to knock off few hundred thousand until they install relief tubes as MEL1 point
-
I also think the lighter color panel makes the interior feel larger or less claustrophobic.1 point
-
Actually I'm more of a brunette guy (at least that's what I tell my brunette wife). I agree it's just personal preference but it's not something easily changed. Maybe I could get my wife to dye her hair....... Andy's interior and panel looks great and that's about what mine will look like when I'm done except I have the burgundy seats that match the carpet. Thanks everyone.1 point
-
Would you install a sewer pipe in your new Ferrari?1 point
-
See, Andy prefers blondes...1 point
-
If you don't have a borescope, you can see them clearly if you remove the tail pipe. it takes 3 cotter pins and about 1/2 hour.1 point
-
Have you thought about gluing "super Velcro" like material on both the panel and the structure. I have no idea whether this is viable, but would like to know if it would work.1 point
-
Hey!!! Guy is alive! @GEE-BEE There are a couple of requests floating around here lately for intake hoses... I think the factory quoted price was .6amu... If you have a minute to review that project again... Best regards, -a-1 point
-
High speed more like 18 inches and at a lower speed it’s more like 15 inches. But at some point the crankshaft goes to negative torque and that is not good1 point
-
drill new ones and eliminate the chance of a screw up, is what I would do1 point
-
I have no idea. I presume that it was descending to land.1 point
-
At what airspeed?1 point
-
I went with the expensive door seal from knots2u.com It is a good seal. We got good seal action everywhere but about the 10-11 o'clock position on the door. I think adjustment of the top latch might be the ticket, but not sure. Everything else about the door seems great. I'll wait for your pirep before taking any action.1 point
-
Call a real Mooney Service Center or the factory. SWTA http://www.swta.net/ It would be good to have the parts number before you call. Eaton has catalogs online. Exploded diagrams are fun. Also the Mooney Parts and Service Manual.1 point
-
That’s what Gatorade bottles are for!1 point
-
Corn Flake.... I did not say LIthium ION.... I said Lithium IRON / LI FE... this is completely different that Lithium ion. There IS NO thermal runaway.. in fact Lithium Iron (FE) is the MOST stable battery technology we have. It is VERY light It requires NO sophisticated management (although for extended none use it is preferable to connect them to a charger designed for them ) They are high capacity and high current, especially considering their weight ( on par with lithium ion)1 point
-
The difference was that the power company wasn't liable for more than their entire net worth if a fire broke out. A lot of people are calling for the state to take over the power grid and I think this is an means to that end. You can make it impossible for a company to do it. -Robert1 point
-
Stick to doing it on jacks rather than in the air. Sure it should work fine, but we've seen enough failures in the air leading to unavoidable gear up's like the incident mentioned above that we no longer do these in the air at the MAPA PPP's for this reason.1 point
-
Yes. And my speed in the descent is almost always well over 200 knots TAS or high in the yellow on the ASI.1 point
-
This how it should be, I've watched/seen shops call multiple times to get approval/order parts and it just drags out. When I had my shop (not aviation) my customers pretty much knew what their bill would be when they dropped it off and generally it was a few bucks cheaper when the dust settled. Also after the Repair Order was written (computer) 2 copies where printed and they signed our copy to authorize the work, very few disputes over the amount in 35+ years1 point
-
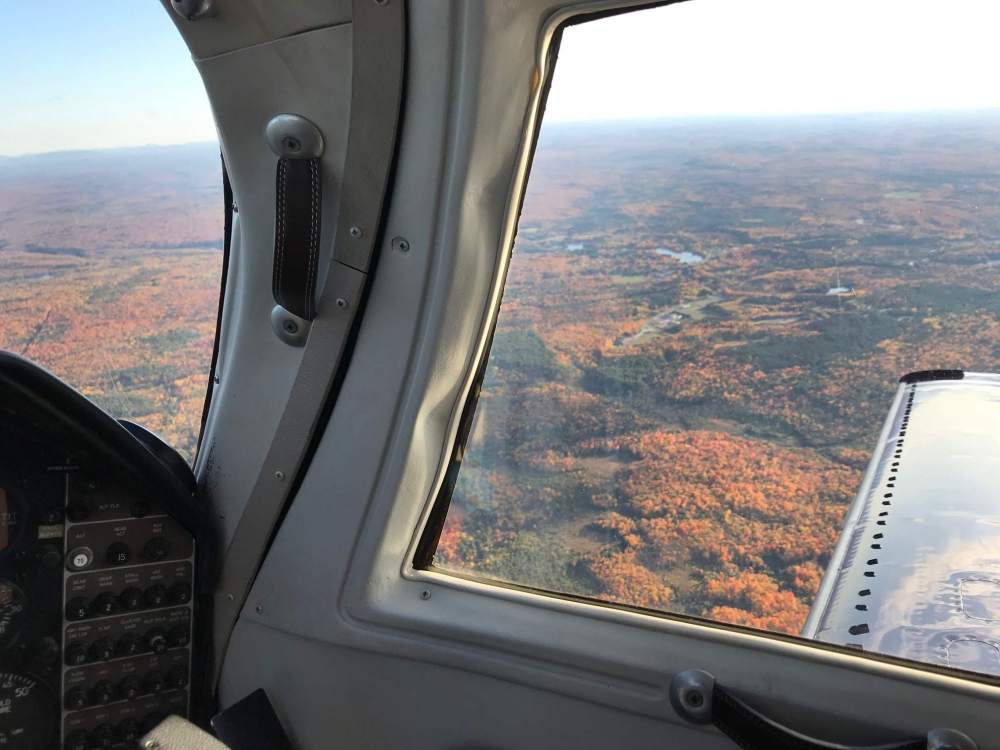
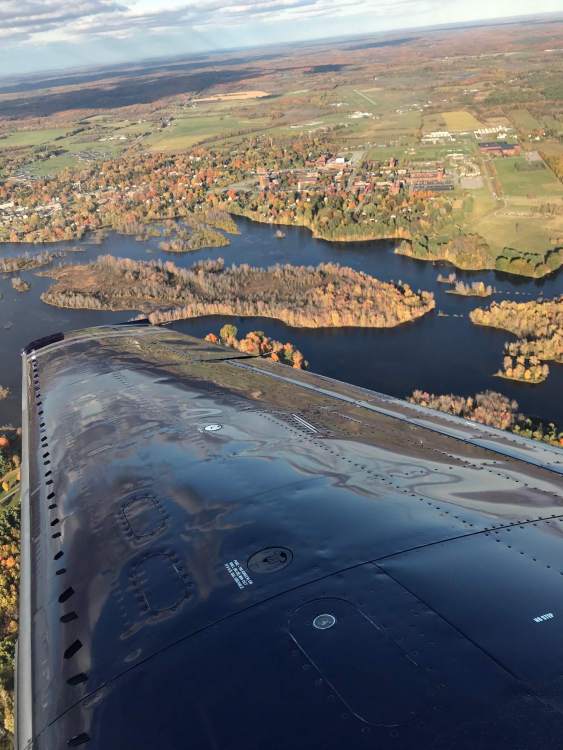
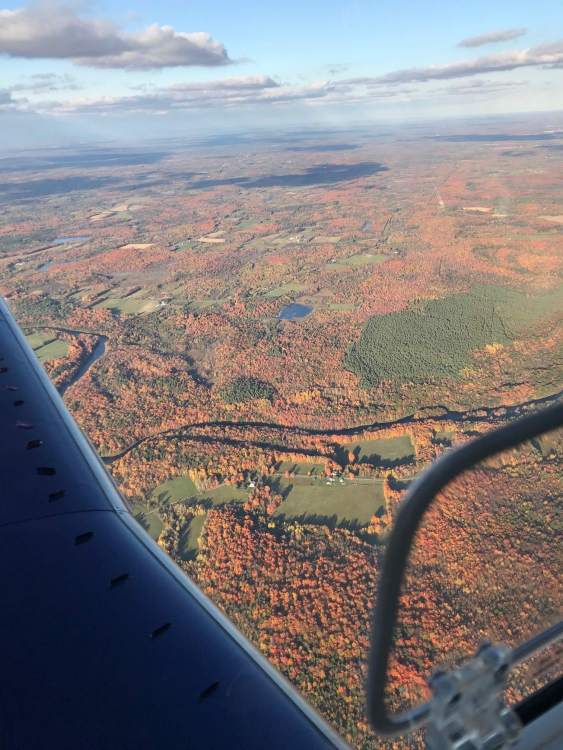
Leaf peeping - Autumn here in the North Country - Adirondacks region. Our house is just off the wing tip in that town river shot. Gorgeous day just flying around.


 1 point
 -
regardless of what you buy...it is expensive to fix up a plane....you are better off finding exactly (or close) to what you will want out of a plane (even though it may be above your price range) than what it will cost you later to fix up a plane....including engine, paint, corrosion, avionics, autopilot, tank resealing, LED lighting Maintenance items like tires, brakes, donuts, are manageable. I started with a really nice hanger queen with a worn out engine for $65,000...and I now have a real nice IFR machine with a factory rebuilt and all the trimmings for over $150k...My biggest regret is that I think I could have found what I now have for about $120k1 point
-
If you look at how the wing is made, it is attached to the roll cage along the top and bottom of the inside panel of the fuel tank. It is easy to imagine that a crash where one wing hits first, that it could torque the wing relative to the fuselage and could tear the seams of that inside panel, releasing the fuel into the cabin. It does seem that bladders would be less susceptible to releasing fuel into the cabin.1 point
-
Don’t mean to be argumentative here, but that is not factually correct. Quoting from the NTSB final report findings: 21. Alaska Airline’s use of Aeroshell 33 for lubrication of the jackscrew assembly, acme screw thread surface finish, foreign debris, and abnormal loading of the acme nut threads were not factors in the excessive wear of the accident acme nut threads. Full report at: https://www.ntsb.gov/investigations/AccidentReports/Reports/AAR0201.pdf Skip1 point
-
There is a full lubrication chart with all the call outs in the maintenance manual available as a download on this site.1 point
-
I love that cup1 point


.thumb.png.7c67574d7b28f67b0b4a17760919b1ac.png)